
An introduction to learning to ride a motorcycle
Riding a motorcycle is easy enough – it’s just like, well, riding a bike. Easier, in fact, because there’s none of that awkward pedalling to upset your balance when you move off. The tricky part is mastering machine control while at the same time learning how to stay safe on the road and dealing with all the potential hazards you might encounter.
Having experience driving a car has both its advantages and disadvantages. On the one hand, you’ll already understand the rules of the road, so there’s less to take in there, although seeing things from a biker’s point of view might come as a bit of an eye-opener.
From four wheels to two
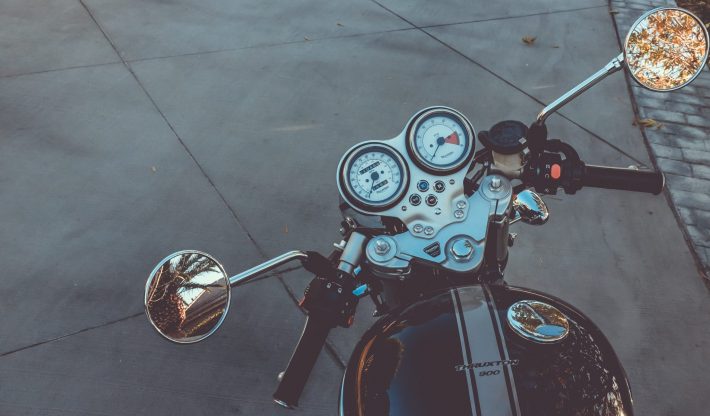
On the other hand, however, your hands and feet will have to get used to doing things a bit differently. On the right-hand handlebar you’ll find the throttle and, ahead of it, the front brake lever, while on the left-hand handlebar is the clutch lever. On each handlebar, inboard of the rubber grip, you’ll find a cluster of switches. The right-hand switchgear will house the engine starter button and a kill switch, while the left-hand switch cluster will include at least a horn button, an indicator switch – left for left, right for right and push to cancel – and a dip/main beam switch for the headlights.
The idea is that the switchgear can all be operated without taking your hands off the handlebars. You’ll also notice that the key controls – horn, indicators, headlight dip/main beam – are on the left-hand handlebar, leaving your right hand to concentrate on the important jobs of controlling the throttle and front brake.
Credit: Unsplash
Finding your feet
Lower down you’ll find the foot controls: the rear brake pedal ahead of the right-hand footrest and and gear lever ahead of the left-hand footrest. Press the gear lever down with your toes to select first, then click it up from there on for second through to sixth. It sounds like a slightly odd arrangement at first but very quickly becomes easy and intuitive.
If you’ve yet to throw a leg over a motorcycle, all that might sound like a lot to get used to, but don’t worry, getting to grips with it all in a controlled environment is exactly what your Compulsory Basic Training (CBT) is for. Perhaps the trickiest thing to master at first is low-speed control, and again, it’s what you’ll concentrate on during the first part of your CBT.

Credit: Rolling Rouges/ Devitt
CBT time
It might sound a little dull but low-speed control is a really key part of riding a motorcycle. If you want to be able to take advantage of a bike’s small size in traffic, then you’ll need to be able to trickle along at walking pace safely, and being able to execute full-lock, feet-up U-turns without toppling over is another genuinely useful skill.
The key to all the low-speed stuff is to relax. You don’t want to be stiff-backed and upright, thighs and groin hugging the tank; instead, imagine you’re a dead weight slouched in the seat, shoulders, arms and legs relaxed and with your hips loose. For full-lock walking-pace U-turns and the CBT’s figure of eight exercise, remember to turn your head and twist your torso slightly in the direction you want to go, then let the bike and the bottom half of your body come back into line with the top half as the bike straightens out beneath you after the turn. It sounds like a lot to think about but with a bit of practice it should all come together.
Riding on the open road
Out on the open road, the machine control side of things is, to an extent, a little easier. Once moving at speed a motorcycle becomes inherently more stable. Another thing you’ll have to get used to is leaning over as you go around corners. Again, to the uninitiated this looks alien and possibly even a bit unnerving, but it very quickly becomes second nature and is one of the most exhilarating parts of riding a bike.
Another thing that’s worth knowing about is countersteering, which you might have heard or read about. Some instructors will cover countersteering while training you for your test, others won’t. But the fact is this: once you’re moving faster than walking pace, to get your bike to turn right you start by turning the bars to the left (and vice versa), whether you realise it or not.
When people talk about ‘trying countersteering’, what they mean is doing it consciously and with a more positive input in order to initiate a turn. Done properly, it can help you turn more quickly and more accurately, and it’s worth giving it a go. To turn right, apply a smooth, positive forward pressure to the right-hand handlebar with the heel of your hand, and you’ll feel the bike start to lean over to the right; the same forward pressure with your other hand on the left handlebar will initiate a turn to the left.

Credit: Unsplash
Steer with your eyes
Whether you’re riding at low speeds around town or more quickly on the open road, one key thing to remember on a bike is that you will go where you look. In effect, you steer with your eyes. This can work for you and against you: to track a line through a corner, simply visualise it ahead of you and you should follow the correct path. However, if you see something in the road that you want to avoid, for example a wet manhole cover or some debris, if you stare straight at it you’re almost certain to hit it. It’s called target fixation, and it’s something you’ll need to work on overcoming in order to stay safe.
The most important thing to remember is to take things steady, take on board what your instructor tells you and not to get carried away once you’ve got your licence. Passing your test is a great achievement and unlocks the door onto a world of fun and excitement, but there’s still a lot to learn.
Now it’s time to get yourself kitted out for your ride…
Disclaimer: the sole purpose of this article is to provide guidance on the issues covered. This article is not intended to give legal advice, and, accordingly, it should not be relied upon. It should not be regarded as a comprehensive statement of the law and/or market practice in this area. We make no claims as to the completeness or accuracy of the information contained herein or in the links which were live at the date of publication.
You should not act upon (or should refrain from acting upon) information in this publication without first seeking specific legal and/or specialist advice. Arthur J. Gallagher Insurance Brokers Limited trading as Devitt accepts no liability for any inaccuracy, omission or mistake in this publication, nor will we be responsible for any loss which may be suffered as a result of any person relying on the information contained herein.
One comment on “Learning to Ride”
Its alright saying just look where you want to go. If that is a bend and you take it too fast it doesn’t matter how much you look at or through the bend if its too fast you will easily lose it. So stay safe on bends,. Consider that they are all tighter than you think, slow a little by say 5 or 10 mph and give yourself space to obtain the best possible view of the bend and road ahead without going close to the middle lines or too close to the kerb or verge that is. Take it slow and steady around the bend with very slight throttle to maintain a constant speed and then after the apex,[ the middle of a bed ] and the road has opened up again then one can accelerate if one wants to.
Be prepared to lose visibility on tight left hand bends and therefore always ride at a speed that one can see it safe to stop in on your side of the road ahead. So if the bend is tight and the distance seen reduces then also ones speed should reduce so that one can stop in the distance seen to be clear.,remembering that on a bend one may be leaning over and to actually stop may not happen unless one is proficient at riding and not a newbie. So going in to slow is better than to fast.
A safe rider knows when to slow down as opposed to any idiot who can twist his wrist and can ride fast. Too many accident happen by actually riding too fast for the conditions and not necessarily being over the speed limit. So ride at 70% of your comfort zone and then you will be safer. Anything above that safer and slower speed could find you hitting something on a blind bend.